my friend Liz lost her sister
I began my first mosaic in August, 2011. Since then it has become one of my favorite hobbies. Always in search of treasures, glass, plates and great finds to place in the mosaics I make. This blog is also for displaying other crafts that my husband or I create.
Thursday, September 29, 2016
Thursday, September 22, 2016
Japanese Crane
finally finished.....
sometimes a project get's started.........then goes to the wayside for quite a while
then inspiration hits again and I complete it in 4 days......................go figure
it sat here for months with only this much done
water is shell tiles and acrylic pearl beads, with some blue and turquoise half gem marbles
bird - wings are plastic chandelier crystals
white and black stained glass - gold back painted clear glass
white glass half gem marbles and white glass globs
and a few acrylic pearl beads
the sky is from sheets of yellow, orange and red stained glass
Monday, September 19, 2016
Tuesday, September 13, 2016
master bath hand towel holders
blue mermaid's box
I decided that my blue mermaid needed to sit up on something. So I took a wooden box that had broken hinges and glue the top shut.
I used the same mosaic tiles on the top that are also on our sink backsplash.
On the edge are some of the pencil tiles from the sink backsplash
the sides have some left over glass tiles that were used in the kitchen
before the box
here she is on her box
I used the same mosaic tiles on the top that are also on our sink backsplash.
On the edge are some of the pencil tiles from the sink backsplash
the sides have some left over glass tiles that were used in the kitchen
before the box
here she is on her box
Wednesday, September 7, 2016
work in progress........
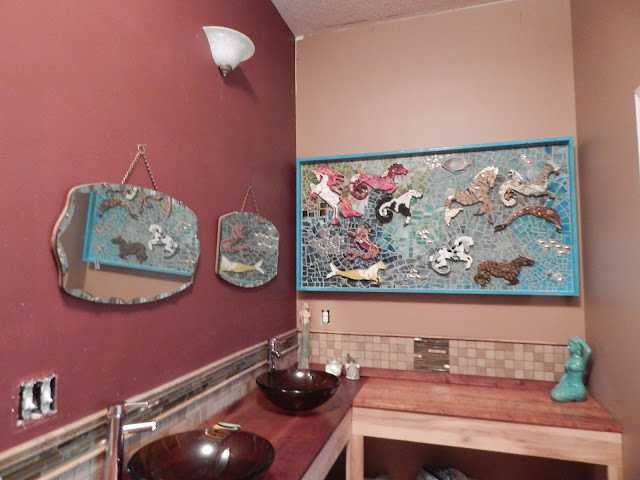
we've been remodeling our master bath
my merhorse mosaic has been hung up
new vanities being built - doors and drawers are not done yet
have been topped with cherry wood boards, cut and planed by my husband
new glass bowl sinks and faucets installed
and a mosaic backplash was installed
this is a 40 x 40 leaded stain glass panel that my husband made
it was created from 2 patterns out of a book
a wonderful guy at my work enlarged both patterns for me
I took the enlarge patterns and created this design for my husband to use to make the panel
we also installed a new mosaic tile backsplash around the tub
still a lot to be done
we need to paint all walls, I have picked out a light silver gray paint color
my husband needs to finish tiling our walk in shower stall
and he needs to build the vanity and cabinets on the opposite side of the bathroom
I'm very happy to have all of this done!
Tuesday, September 6, 2016
House Warming Mosaic
forgot to measure it, but it's some where around 12 x 12 or could be 12 x 14
The plaque is called ABS's of Faith
I used a lot of different plate patterns. Acrylic gems and beads, shell pieces (mother of pearl), glass pearl beads and a few half gem marbles. Oh and there are 3 tiny crosses on the piece too.
My longest time friend and her husband just bought a house. I made this for them as a house warming present.
I used a lot of different plate patterns. Acrylic gems and beads, shell pieces (mother of pearl), glass pearl beads and a few half gem marbles. Oh and there are 3 tiny crosses on the piece too.
Wednesday, August 31, 2016
master bath switch plates
Friday, July 29, 2016
Mosaic Zen Garden
Thursday, July 28, 2016
Fused Glass Sailboat Light Catcher
Monday, April 18, 2016
Jana Roberts Benzon - Polymer Clay Artist - Laser Cut Workshop
To see some amazing designs created with polymer clay check out Jana's website:
JRB Art & Design
Jana was the instructor for a 2 day polymer clay workshop hosted by the Central Mississippi Polymer Clay Guild on Saturday, April 9th and Sunday, April 10th. Jana instructed the students on how to create her "Laser Cut" technique. Each student working toward creating a pendant in this style.
The term "Laser Cut" describes the visual effect of this eye-catching technique with it's precise angled cuts, which reveal intricate, delicate designs. Jana also shared many tips for using Kato Polyclay. She generously shared a vast amount of knowledge in techniques and clay information with us.
This workshop consisted of learning 8 techniques to complete the front of a laser cut pendant. How to form the bail. And how to finish the piece to achieve your final results.
Here are 3 of Jana's Pendants created in the Laser Cut style. The pendant bails are all on the bottom in this photo in order to share how she finishes out each bail.
Here are a few of the student pendants that were created. These had just been baked to set the top of the pendants. The only remaining steps left were to - shape them and set them with a slight bend - remove the tube that is extending from the bail - and add the final backing to the pendant and bake them again.
we ran out of time to add the backing and do the final baking on ours, but Jana did bake a piece and demonstrate how we should finish our pendants
my workshop pendant
This was my very 1st polymer clay workshop. I can say that Jana was an amazing artist with a wealth of knowledge that she unselfishly shared with everyone who attended. I hope we can get her back for another workshop next year.
Thank you so much Jana.
p.s., this is one of her pieces that I purchased at the workshop. Beautiful. I will love wearing it.
Friday, April 15, 2016
Wire Weaved Quart Cluster
This was my 1st official wire weaved piece of jewelry. Watching YouTube videos and reading off the Net. I made a few sample weaves using tutorials.
This quartz cluster was in the bucket of rocks and quartz that the husband and I got at a garage sale a while back. There were not a lot of good pieces that can be used in jewelry. But, I have several single quartz pieces and a few larger ones that I can use. Mostly will have to use the other ones in mosaics.
When I asked my husband if he liked it he said "it's big".
So I said you don't like it.....dear Redneck said "it's big".
Men! Well, I like it and that's all that counts I guess.
I free formed the wire piece on the left side and used it to hold the stone down on the copper wire frame that is under the stone. It is also running up to the top to form the bail.
There are several coiled wire pieces running mostly toward the bottom of the pendant. And lots of beads.
There is a smaller weaved piece running along the side on the right.
Wednesday, April 6, 2016
Crystal Cave Charm - Nicole Hanna pattern
Nicole Hanna Jewelry website
Nicole Hanna is an amazing jewelry artist. She weaves wire into unbelievable designs that are works of art.
She generously shared a free tutorial yesterday and I was able to make this pendant from that tutorial. Of course, no where as beautiful as her work. But, hey in my defense.....I'm new to wire weaving.
I started playing with wire last week. I bought some and did a few patterns found on YouTube. I did wire wrap a quart crystal cluster earlier this week. I will show it later.
Now the question to myself is........do I want to make another one and use these as earrings?
Thank you so much Nicole.
p.s., I need to add the jump ring at the top to hang it from
p.s.s. and I need to buy a ruler that has metric measurements on it.
p.s.s.s and buy a magnifying glass :)
and here is the original piece from Nicole.