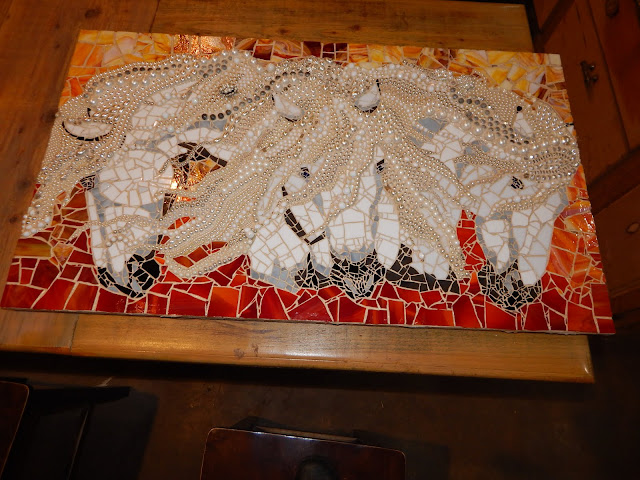
I finished the 3 horse head mosaic. My husband cut the board that I used. After I finished the design, he helped me grout it. I ended up using Almond - Non Sanded Grout. After the grout was dried, I cleaned up the surface of the mosaic. Sealed it with high gloss art varnish. Then my husband hung it on the wall for me. We did have to rearrange a few pictures to get it where I wanted it.
I began my first mosaic in August, 2011. Since then it has become one of my favorite hobbies. Always in search of treasures, glass, plates and great finds to place in the mosaics I make. This blog is also for displaying other crafts that my husband or I create.
Friday, April 17, 2020
Tuesday, January 28, 2020
Raven Grouted
I finally got around to grouting this piece.
the nest is not grouted.
see this post to find out about creating his nest:
a multitude of found items went into the nest - along with some strands of beads and some large wooden beads, buttons and other tesserae
the tree limbs are broken tile that looks like wood
The raven is a variety of blank and gold beads
the tree leaves are different colors of green stained glass, faux pearl and glass beads, faux gems and a whole bunch of plastic silver leaves from some cheap jewelry from the $1 store
and a few pieces parts from bracelets, etc.s
Thursday, January 23, 2020
Earth, Wind and Fire - 3 Horse Head Mosaic
This pattern was created by Toni Whitney and as done to be used to make a quilt.
I knew when I saw it that I had to buy it and use it for a mosaic.

I can't imagine doing this as a quilt. Cutting all these pieces would give me nightmares.
Included in the pattern is one sheet with all 3 horse heads.
and sheets to do the horse heads individually
I enlarged the pattern on our copier. I copied it into 6 sections. I taped them together to make a single pattern.
My husband cut a board for me to put the mosaic on.
Then using carbon paper, I transferred the design to the board.


