Wednesday, April 10, 2019

glue geode redone in resin

a while back I tried doing a YouTube video where the lady showed you how to use white glue instead of resin.  I was not pleased with the end result.

here is the result of that experiment


I had the frame in my stash from garage sales and storage unit clean outs
my husband cut a board to fit the frame
I glued the board into the frame
then used caulk to seal the edges

I added lots and lots of stones to the top of the board
also added several piles of gold and silver beads
then poured resin
added glitter
used alcohol inks
and silicone oil


fiddling with it by using the heat gun to push the resin around
adding glitter where I thought it needed it
or more stones


3 Horse Head Mosaic - Finished

 Finished the glitter.

Covered in resin.

And, a frame made by my husband that we chalk painted.


Tuesday, April 9, 2019

3 horse mosaic - phase 2

my glitter stash
more than one grown woman should own.......


rummaged thru the glitter stash and found several containers


poured some of each into a bowl, mixed it and added more until I came up with this mix


got out my Mod Podge and a foam brush


put a thick coat of Mod Podge on the board
sprinkled with glitter
mashing and smoothing it in to the Mod Podge


After this layer of glitter dried
I added another thick coat of Mod Podge over it to make sure it was all glued down

I dug out the green glass pieces


and sprinkled some on top of the glitter


all ready for a layer of resin


3 horse mosaic - phase 1

I'm always looking for mosaic ideas.  I look at stained glass and applique patterns a lot.  I found this 3 horse stained glass pattern.  This is printed on a 8 1/2 x 14 inch sheet of paper.


using carbon paper, I traced the pattern onto a board
then started to fill in the horses with lots of small things from my craft room hoard

the manes are bugle beads
ear is a decorative chain with small discs
the head of the horse is B.B's
the eye is a black bead with a silver seed bead glued on the hole
there is more chain on several places of the face
large links of chain were cut to form the area around the nostril and mouth
silver seed beads under the neck and at the bottom of the chest
silver glass pebble rock and silver plastic beads in the body
a piece of chain on the chest
and more B.B.'s for the leg

this horse is using the same materials as above, except in gold or copper B.B.'s
the ears are petals from a flower pin with some chain links glue to the outer edge of the ear shape

same materials as the other silver horse except this one has one ear formed from a different type of chain
and the second ear is formed from cutting up links on a large chain
where is some ball bead chain on this one around the nose and that runs up the front of the face


red dot in this one and one above is to remind me not to fill the area in........
they are suppose to be blank............
yes, I need reminders like that sometimes!

Raven on his hoard - not grouted

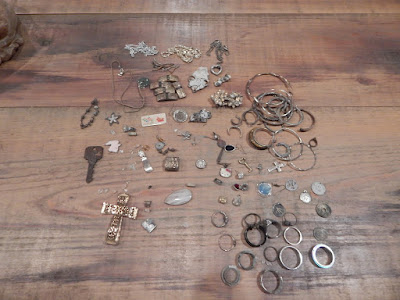
this is a picture of some junk metal stuff that was found when a family member was metal detecting in Florida
I told him to keep his junk finds and I would use them in a mosaic

You don't have to go on a scavenger find to locate the above.  I used a lot of his stuff in the nest for the Raven.

I was having a hard time free form drawing the Raven.  So my sweet hubby drew him from a image I had printed out months ago.

The tree is tile that looks like wood flooring.  I used several colors of green stained glass, beads and some leaves off of some costume jewelry for the leaves and limbs in the tree.

The Raven is mainly beads.

The sky around the Raven is several colors of blue stained glass and some blue glass aquarium gravel.


The nest has resin poured over it.  I knew gluing down that much stuff into the nest would be a nightmare.  


This is the same technique used to do a free form geode - EXCEPT - for the geode, you need to form it on plastic, so you can peel it off.  Also, a geode would be continuous in a circle or wonky oblong circle.  I'm waiting for the silicone to dry before putting the rest of the tape at the bottom.


After the silicone caulk dried, I finished adding tape around the edges and made sure all seams were closed up.  I only applied a thin layer of resin over everything.  But, I did try to at least make sure it I streamed a thin line of resin as I poured over the top of the nest.  I wanted the things in the next to have up and down texture, but be smooth to the touch.

Once resin was poured over the nest and it dried..........nothing moved.  

Now waiting to be grouted.  The nest WILL NOT BE grouted.  Only the parts around the nest.


Tuesday, April 2, 2019

Giant multi-colored geode

I had my husband cut this out a while back.  One thing I should have done was made the inner circle smaller so I could add the jewels into a smaller opening.  I decided not to try and fill this opening up because it would have cost a small fortune.


p.s.:  remember because of the gloss of the resin.........some of the marks in the photo's are glare